
Mike Cline is one of our ambassadors. He ties in Bozeman, fishes southwest Montana most of the year, and every fall he takes a box of saltwater flies to the Gulf Coast of Florida. In August he sent us this piece about that box, and about why every fly in it is barbless.
It runs here as he wrote it. After it, a note on the two hooks he ties on and the two patterns he leans on.
Predators, Prey and Angler Safety
By Mike Cline
When I started to take inshore saltwater fly fishing along the Florida Gulf Coast seriously in the mid-1990s, I quickly learned how much I really didn't know. I would always be a visiting angler able to maybe put together a couple of weeks of everyday fishing each season. Visiting family in the Tampa Bay, Sarasota Bay region, inshore saltwater angling opportunities were vast and in my view far more complex than the Western trout fishing and Southeast/Midwest bass fishing I was used to. Of course researching the predators, prey, flies and gear necessary to tackle inshore saltwater target effectively with flies occupied a lot of time in preparation for annual trips. There was no shortage of information, but recommendations and opinions varied widely. However in retrospect there was one piece of advice that showed up more often than others. Mashing down barbs to create pseudo barbless flies was highly recommended and with good reason. Releasing hooked fish safely and stress free was made far simpler with no barb in the way. No matter what you were catching, getting the hook out quickly and safely benefited from being barbless.
Speckled Trout are ambush predators with large mouths and typically inhale their prey deeply. Unfortunately, their mouths are fragile and barbed hooks can do significant damage.
Snook have large, tough mouths and a barbless hook is much easier and quicker to remove. As an added benefit, the quicker the hook is removed the less opportunity there is to damage the leader or cut yourself on their razor sharp gill plates.
Redfish have small, tough mouths at the front of a very muscular fish that is tough to hang on to. Getting the hook out quickly is a plus.
Ladyfish, a very popular fly rod target is a blast to catch but they have two characteristics that can be very annoying as you try and remove hooks from their mouths. They are slimy as heck and hard to hold on to and they have tiny rasping teeth that will damage tippets while you try to remove hooks.
Two other inshore targets bear mentioning because they have dangerous teeth—bluefish and Spanish mackerel. If you are into them you are probably using a bite tippet, but that doesn't protect your fingers when trying to dislodge the hook.
Of course there are other catches out there with spines and teeth that will do damage and no matter what you are catching barbless will not only mitigate stress on the fish it might prevent blood loss on the angler's part.

Photo by Mike Cline.
Although I tied and fished plenty of saltwater patterns on the Firehole 811 and 839 with success, the introduction of the Predator models a few years back was a major improvement. Over the last three seasons, I've used almost exclusively the 801P and 802P hooks for the saltwater patterns I take to Florida every Fall. They are stout and the wide gap makes tying easier and hooking fish more effective. Flies that survive are washed in warm, soapy water after every trip and I've yet to have one show any signs of corrosion.
Two of my most favored patterns are the Dancing Deceiver and Myakka Minnow, both perfectly suited to the Predator models. They are unweighted and fished on a long sink tip (SA SONAR 30 Warm) and short tippet (3-4' 0X or 15# Fluorocarbon).
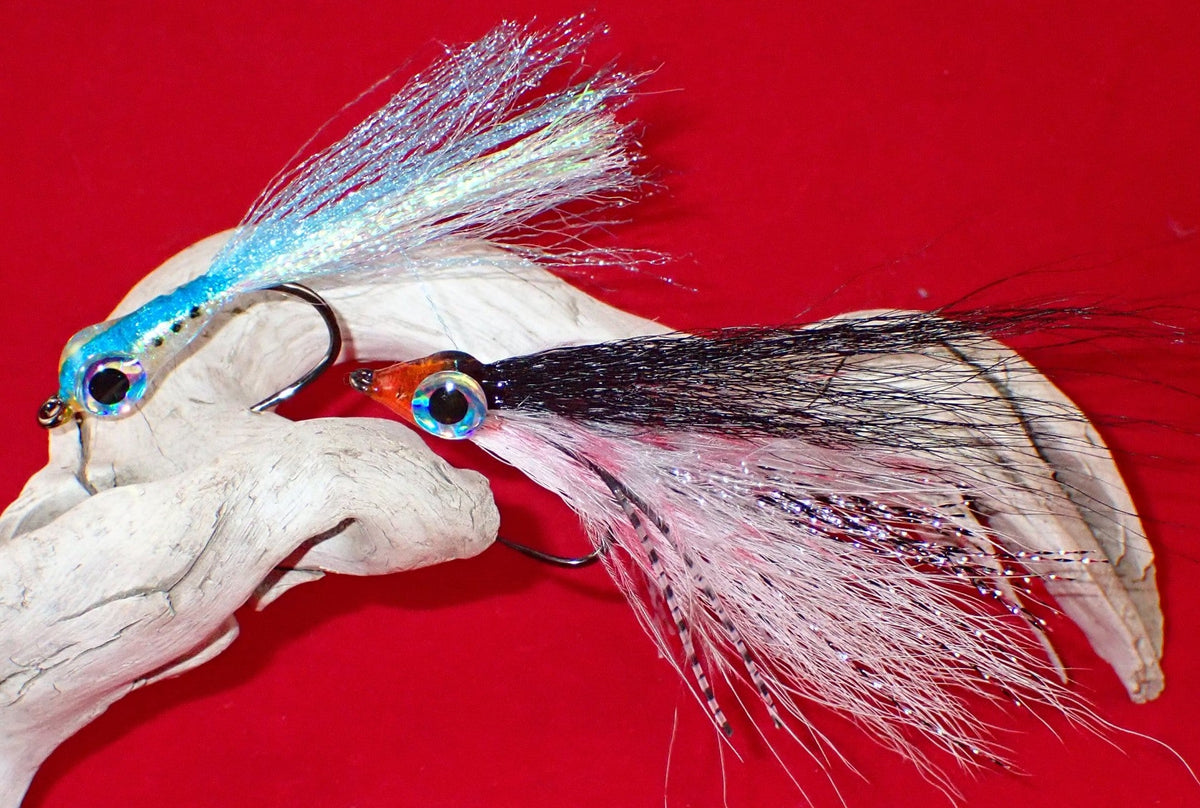
The Dancing Deceiver is a bucktail deceiver variation that incorporates vinyl or silicone legs and barred marabou under the bucktail wings. Unlimited color variations possible to replicate local baitfish forage. Tied on an 802P 2/0 Predator hook.

Dancing Deceiver on an 802P 2/0. Photo by Mike Cline.
The Myakka Minnow is a Steve Gibson creation from the Sarasota Bay region. A dense pattern that dives naturally when tension is released. Tied with mono thread, flash and flat braid. Takes alcohol markers well and is coated with UV resin. Tied on an 801P 1/0 Predator hook

Myakka Minnow on an 801P 1/0. Photo by Mike Cline.
Firehole Predator hooks are a good bet for inshore saltwater patterns. The fish and your fingers will appreciate them.
The two hooks
Mike ties the Dancing Deceiver on the 802P and the Myakka Minnow on the 801P, and the reason is in how the two are drawn. At the sizes he uses, the two hooks open the same gap. What changes is the shank and the wire.
The 802P is the longer hook. A deceiver is built in layers along the shank: tail, legs, barred marabou, then bucktail wings over the top. A longer shank gives that stack room to sit in proportion and still leave the gap open behind it.
The 801P is the heavier hook. It carries the heaviest wire in the Predator line, size for size. The Myakka Minnow is a short, dense, resin-coated fly that Mike describes as diving when the line goes slack. A compact shank keeps the fly short, and the weight of the wire is part of why it drops.
Both are manufactured barbless, black nickel, with the point turned up toward the eye, and both come in #1 through 5/0. Packs of 15, one size per pack. The 801P is where to start if you tie one saltwater fly.
About the Myakka Minnow
Steve Gibson wrote up the Myakka Minnow for Fly Anglers Online. He named it for the Myakka River near Sarasota, where he built it to match the tiny minnows the fish would take when they ignored everything else. The original is small, tied on a #12 with lead wire and epoxy, and Steve noted at the time that it could be tied larger for saltwater. Mike's version on a 1/0 801P is that larger fly.
The recipes
Mike Cline's recipes and notes.
The Dancing Deceiver
The Lefty’s Deceiver fly pattern or more appropriately the deceiver style can be tied with lots of variations for both freshwater and saltwater targets. The Dancing Deceiver as I call it incorporates two additional materials—marabou and silicon legs. The marabou inspiration comes from the marabou method used in the Gartside Soft-hackle Streamer while the silicon legs are a common component in many saltwater patterns. Their purpose is movement and contrast. Variegated, bi-colored silicon legs provide subtle movement and contrasts when the fly is wet. Marabou, especially barred marabou, also provides movement and contrasts when the fly is wet.
Materials
- Hook: Firehole 802P 2/0
- Thread: UTC 140 White
- Tail: Bucktail (any color)
- Flash: Any slender flash such as Crystal Flash, Polarflash, Crystal Pearl Flash
- Body: Flat braid
- Silicone Legs: Any bi-colored, variegated legs
- Marabou: Fine or wide-barred marabou
- Wing: Bucktail (any color)
- Belly: Bucktail (any color)
- Eyes: 5-8mm dome eyes
Color combinations are essentially infinite and should be patterned around the type of baitfish being imitated.
Steps
- Create a thread base on the back half of the hook shank to the hook bend aligned with the hook barb. Leaving the front half of the hook shank bare helps maintain room for the middle section and bucktail.
- Select a small clump of bucktail for the tail. Trim to desired length. The tail should extend 1 to 1.5 times the hook shank length. The tail is tied in at the middle and on top of the hook shank leaving the forward part of the hook shank bare.
- Tie-in the desired number of flash fibers on top of the hook shank. The flash should extend to just short of the bucktail tail.
- Tie-in and tightly wrap the rear half of the hook shank with flat braid. The braid helps keep the tail fibers and flash straight while protecting the wraps for both the bucktail and flash. Flat braid is fragile and to protect it from fraying caused by toothy fish, coat the braid body with head cement.
- Select 3-4 strands of bicolored, variegated silicone legs. Fold in half and tie-in the ends just in front the braid body. The legs should be tied-in on top of the hook shank and form a loop over the tail. Cut the loop to create six or eight legs.
- Tie-in the barred marabou immediately in front of the silicone legs and braid body. There are three configurations that can be used for the marabou. 1) Tie-in a flexible marabou feather by the stem and wrap it forward around the hook shank like hackle. Tie it off and fold back the tip of the feather. 2) Tie-in a single clump of marabou on top the hook shank. 3) Tie-in two clumps of marabou on top and bottom of the hook shank. This configuration allows you to use different color combinations of marabou if desired. When the marabou is tied-in and/or wrapped take a number of thread wraps back over the base of the marabou to help sweep it back over the body. Additionally, clean thread wraps over the marabou creates a clean, smooth base for the bucktail wing and belly. You should have at least ¼” – 3/8” of space at the front of the hook to securely tie-in the bucktail.
- Take a slender clump of bucktail for the top wing and cut to desired length. Ideally, the bucktail wing should extend to or slightly beyond the bucktail tail. Trim the butt ends squarely flush and tie-in just behind the hook eye. Take a number of tight thread wraps over the bucktail back to the base of the marabou. At the base of the marabou, press firmly down on the bucktail to flatten and flare the fibers slightly down the sides of the fly.
- Repeat the process for the belly wing and take enough thread wraps to completely cover the bucktail with a smooth head.
- If you are using colored thread, tie-off with a whip finish or several double half hitches and proceed to step 10. If using white thread, tie-off with a whip finish or several double half hitches and before trimming the thread, you can color the head wraps with any color you desired using an alcohol marker or sharpie. Allow the color to dry a minute before cutting the thread.
- Mounting the eyes. A rotary vise is of great benefit here for the four-step process of mounting the eyes and finishing the head. 1) Rotate the vise 90 degrees so that the side of the fly is facing up. Apply a small drop of UV resin at the junction of the thread wraps and the materials. Place the desired eye so that is covers the junction with ~ half the eye above the hook shank and half the eye over the material. Holding the eye in-place with your finger, quickly cure the UV resin. This tacks the eye in-place. Repeat for the other side of the head ensuring the eyes are aligned top and bottom, front and back. 2) Place a dollop of UV resin between the top of the eyes while holding the bucktail down. Cure the UV resin. Repeat for the bottom of the eyes. It is important to confine the UV resin as much as possible between the eyes to allow it to penetrate and not run while holding down the bucktail. 3) Apply a thin coat of UV resin over the remainder of the thread wraps while also covering the eyes with resin. Ensure no resin blocks the hook eye. Apply resin just beyond the rear of the eyes. The resin will run if too much is applied. Rotate the fly until the resin levels, then cures while continuing to rotate. 4) Once cured, apply a thin coat of head cement over the cured UV resin.
The Myakka Minnow, saltwater version
The Myakka River flows approximately 72 miles southwest from the prairies of Central Florida to Charlotte Harbor on the Florida Gulf Coast. By all accounts this National Wild and Scenic River provides some pretty good fishing for bass and other warm water species in its freshwater sections and excellent Snook fishing in the lower estuarial waters. The Myakka is within easy reach to Sarasota anglers and was one of the favorite freshwater destinations for Sarasota guide Steve Gibson. Steve tells the story of the genesis of his Myakka Minnow after a frustrating day on the Myakka in 2005. My saltwater version is unweighted and designed to be fished on a long sink tip (25-30’) and short, stout (3-4’ OX) tippet. It is a go to fly for deep pot holes and channels in inshore grass flats.
Materials
- Hook: Firehole 801P 1/0 (Any appropriately sized SW hook works)
- Thread: Mono 0.10
- Tailing: Bucktail (Any synthetic streamer fiber or flash, marabou or hackle works)
- Body: Flat braid
- Topping: Flash or flat braid
- Eyes: 3D eyes
- Coloration (optional): Alcohol marker
- Coating: UV resin and head cement
Tying steps
The Myakka Minnow is best tied with a full rotary vise and bobbin hanger.
Color scheme is at the discretion of the tier, material availability and target species
- Create a thread base from the hook bend to approximately 1/8” behind the hook eye. Finish with the thread 1/8” behind the hook eye.
- Select a modest clump of bucktail. The bucktail will be tied in on top of the hook shank at the 1/8” behind the hook eye point and should extend approximately 1 to 1.5 times the hook shank length beyond the hook bend. Trim bucktail butts accordingly. A similar approach should be used for synthetics, marabou or hackle.
- Add a few strands of flash on top of the first clump of bucktail.
- Add another sparse clump of bucktail on top of the hook shank similar to step 2.
- Tie in the topping material facing backwards on top of the bucktail at the hook bend.
- Tie in a generous length of flat braid at the hook bend and bring the thread forward to the hook eye. Secure with two double half-hitches and position the thread over the bobbin holder.
- Slowly rotate the vise while holding the flat braid tight. Create tight, slightly overlapping wraps up to the hook eye. Repeat going back toward the hook bend about two thirds of shank length. Repeat several times gradually increasing the diameter of the body braid near the front of the hook. Carefully move the thread behind the braid and take several tight wraps from the thickest part of the body to the hook eye ensuring the braid is securely attached. Trim the braid end.
- Pull the topping material forward to the hook eye, secure with a couple of tight wraps. Pull the topping material tight ensuring it is well positioned on top of the fly. Pull the remaining topping material tight back toward the hook bend and secure with thread wraps from the hook bend to the hook eye. Finish with two double half-hitches at the hook eye. Trim the topping material to align with the end of the tailing material. Do not trim the mono thread until completing Step 9.
- To prevent the thread wraps from loosening and possibly causing the braid or topping to unravel when the thread is trimmed it is useful to apply a thin coat of UV resin over the front 1/4” of the fly before trimming the mono thread. Additionally, if using alcohol markers to add color to the fly, it covers better and doesn’t run into the braid if the braid is first sealed with a very thin coat of UV resin.
- To add the 3D eyes rotate the vise 90 degrees and tighten. Place a small dollop of UV resin at the head of the fly where you intend to place the eyes. Center the eye over the UV resin and cure enough to tack the eye in place. Rotate the vise 180 degrees and repeat the process ensuring the two eyes are aligned.
- Add and cure UV resin in sparse amounts to prevent running. Start with the gaps between the eyes on top and bottom of the fly. Then apply and cure resin to the top, side and bottom of the fly. If the resin starts to run continually rotate the vise to level the resin and continue to rotate while curing. At the head of the fly ensure a thin coat of resin covers the eyes and the joints between the eyes and body. Ensure a thin coat of resin covers the fly at the head just behind the hook eye. It is very important to make sure there is no resin filling the hook eye when curing. Once all the resin is cured, coat the fly with a thin coat of your favorite head cement.
Putting it together
Mike's point is simple and it holds for every fish on his list. On a speckled trout the barb is damage. On a snook it is time spent near a gill plate. On a ladyfish or a mackerel it is your fingers near teeth. A barbless hook shortens all of it.
If you are heading south this winter, leave the pliers at home. Tie them barbless from the start.
Firehole Sticks 801P and 802P, #1 through 5/0.
Thank you to Mike for this one.
~John

Leave a comment
All comments are moderated before being published.
This site is protected by hCaptcha and the hCaptcha Privacy Policy and Terms of Service apply.